Friday, May 26, 2017

May Scrapbooking Top 50

 Friends, before we get onto the crafty business at hand, I'd like to let you know that I will be participating in the Act For Peace Ration Challenge during Refugee Week.  From 18-25 June I will be eating the same rations as a Syrian refugee - just a small amount of rice, lentils, chick pease, sardines, oil and kidney beans.  That's it - no meat, coffee or alcohol.  (And between you and me the hardest bit of all that is the no coffee!!!)
Sponsorship in this challenge will help provide urgently needed food rations, healthcare and education to Syrian refugees.  If you are interested in donating, or just want to know a little bit more, please visit my sponsorship page:
I am taking the Act for Peace Ration Challenge during Refugee Week and opening my eyes to what it's like for refugees to survive on rations. From 18-25 June I will be eating the same rations as a Syrian refugee - just a small amount of rice, lentils, chick peas, sardines, oil and kidney beans. That's it. No meat, coffee or alcohol. - See more at: https://actforpeace.rationchallenge.org.au/fundraisers/juliehearn#sthash.gzdFbM4L.dpuf

I am taking the Act for Peace Ration Challenge during Refugee Week and opening my eyes to what it's like for refugees to survive on rations. From 18-25 June I will be eating the same rations as a Syrian refugee - just a small amount of rice, lentils, chick peas, sardines, oil and kidney beans. That's it. No meat, coffee or alcohol. - See more at: https://actforpeace.rationchallenge.org.au/fundraisers/juliehearn#sthash.gzdFbM4L.dpuf
 https://actforpeace.rationchallenge.org.au/fundraisers/juliehearn

And now we return to regularly shecduled programming . . .

After completing 18 school photos, production-line style (which you can read about in my previous post) I was ready for something a bit different! A challenge, perhaps?

I chose this month's sketch from Scrapbooking Top 50:


How cute is that!

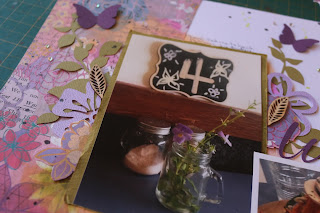
here's my entry:


I ended up binge die-cutting for  this one - creating whole pages of leaf fronds, flowers and butterflies, which I think took longer than the rest of the page put together!


So happy with how this one turned out!  This page also marks the three-quarter mark of my 100-page spending freeze, so that's exciting! 

Thanks for visiting and I hope to see you again soon!


Scrapbooking school photos, production-line style.

So guys, if there's one thing I find boring to scrapbook, it's school photos.  The limitation of school uniform colours (which for our family have included maroon-and-gold and currently includes forest green) and the sameness of the format, year after year, times three children.  No wonder I'm so far behind!

But on the flipside, when you get into the zone, catching up on a whole bunch of school photo pages at once is a great way to churn through a bunch of pages - in less than a week I've managed to make 18 pages towards my 100-page spending freeze goal!


If you've never thought of doing a production line of pages, here's my process:

Step one: choose the photos you want to scrap, keeping to one theme. 
In my case, the theme is obviously school portraits, but you could apply the same process to many other themes, eg beach holidays, birthday parties, christmas etc.

Step two: Choose papers
I pulled out school uniform colours and whites/neutrals.  For layering I pulled my large scraps in these colours as well as yellow and red for contrast. 
(Optionally, you can focus on particular products you want to use up - I focussed on two paper pads I still had quite a few papers from)


Step three: Adhere papers and photos.
(But don't put your papers away just yet!)

Step four: titles
If you own a die-cutting machine or letter stamps, now is the time to use them!  With repetitive titles like "Year 5" "Year 6" "Year 7", now is not the time to be wasting all those "a's" and "e's"!
I picked out a largish offcut of cardstock that matched a page, chose some other pages that could use the same colour title, and went to work on my Silhouette.  I simplified the process further by using the same font and text size.


Step five: embellishing. 
Again, rather than go through every embellishment in your stash, pick a small selection that works with your theme.  I chose a set of largish wood veneers and my fake enamel dots.  I also used washi tape, the branding strips from the papers I had used and also cut a few circles from my left-over papers to give my embellishments somewhere to sit.


Step five: Journaling and finishing touches
I don't journal a lot (or sometimes at all) on school portrait pages, so this step is easy.  Finishing off meant splattering and trimming off the bits that hung off the edges.  But of course you have full permission to go back and pull more bits from your stash.  I was doing a couple of soccer portrait pages at the same time, and I went back and made fake flair for those pages.   


Have you ever tried production-line scrapbooking?  Whatever your preference, I hope you find some crafty time this weekend! 

Monday, May 15, 2017

A couple of videos and some exciting news

So it's been pretty quiet around here in blog-land.  In real life, it's been a lot busier!  We had a week away in Melbourne, plus visiting relatives on the way.  I'd barely recovered from that before I had a couple of weeks full time work, with a birthday party in the middle and a Eurovision party this weekend just gone.  Of course I got a pretty bad head cold in the middle there, but soldiered on!  I managed to get Rohan and Maddy to voice-over a video for me which I haven't yet shared here.  If you haven't yet watched it yet, you should - it's absolutely HILARIOUS!!! (at least I hope you'll think so, I sometimes wonder how the Australian sense of humour translates to the northern hemisphere)


But wait, that's not my exciting news.  Drumroll, please . . . .

The kids actually allude to it in the video above, incorrectly stating that I have joined the DT for the Counterfeit Kit Challenge.  Well, that would have been awesome too, but in fact . . .

. . . that's right! I've joined the Crafty Maven Getaway Summer team!!! (Winter here, but that's OK! lol)
and I may have accidentally chosen a date earlier than was wise my first video . . . but it's done!  Croaky voice and all!


For my first video I chose to do "Stash It Monday", where, you guessed it, you make a page from products deep within your stash.  Actually, there are no rules about how deep within your stash you have to go, but boy, I dived in deep! Coloured brads, knitting wool and  DIY flair from a counterfeit kit that would have easily been 2 years old! Basic Grey monograms that were a freebie when a store was getting rid of sharing some older stock with purchases. None of those papers were exactly purchased yesterday either!