Showing posts with label organisation. Show all posts

Saturday, November 26, 2016

Sorting Patterned Papers.

So my oldest son, Rohan, completed his last HSC exam, turned 18 and did his first shift at Macca's, all in just over a week.  That's a pretty big week!

Currently his plan for next year is to take a gap year before starting Uni the year after, work at Maccas, make art videos and become a Youtube superstar, as you do.

Being the super-proud Mum that I am, here's his channel, MadeByRohan.

At about the same time that he and my husband were making a camera rig for his desk, I bought a huge huge huge stack of patterned papers (all on special of course) so I thought, why not start my own Youtube channel and make my own videos, starting with one on how I sort my patterned papers.  So I did! And here it is:

(Warning: it's literally me rambling on about papers for nearly 15 minutes, so if that sounds boring to you, I won't be offended if you don't watch it!!  Also I didn't check the focus before I started, so it isn't great. Sad face.)


My son said to me, Mum, your channel is called "Spend Less Craft More" and one of the first words you use is "splurge".  And it's true, I have let my stash build up a scary amount since starting this blog however many years ago, so I have a spending freeze challenge in mind for myself in the new year.

Stay tuned!

Thursday, August 6, 2015

Craft Room Reorganisation 3: Embrace the Rainbow (Flat Embellishments)

Welcome back to the third instalment of my Craft Room reorganisation series, largely inspired by Tiffany Spaulding.
Embellishment storage is an absolute mine-field of containers for us scrapbookers, isn't it?  We have jars full of buttons and tackle-boxes full of ribbons and wood veneers and brads, and eyelets that come in their own cute little containers again.  We have sheets of stickers shoved into boxes in one spot and washi tape in baskets and more embellishments still in their packaging somewhere else again.
Small wonder we never remember to use half of what we own!  Tiffany's suggestion is, rather than divide our stash up by type (buttons here, chipboard there, ribbon somewhere else) we combine and conquer!
As I mentioned in my last post, Tiffany actually has a 4-part system, which includes alpha-numeric, themes, calendar year and rainbow.  If you buy a lot of supplies by theme and calendar year (and I know a lot of you do!), you might want to visit Tiffany (here  or on Youtube here) for more information about that.  But I don't, so I skipped those sections and went straight to the rainbow!
I'm only dealing with my flat embellishments to begin with.  Most of my bulkier embellishments (ribbon, washi, buttons, brads etc) are already stored by rainbow within their own sections, but I'm yet to come up with a storage system that will unite them together.

Sometime last year I made a start on trying to organise my Silhouette die-cuts better.  I had come across a video on Youtube from LisaEDesign (watch it here) where she had made her own divided pages  by cutting and sewing ordinary office-supply A4 plastic sleeves.
I liked that idea but my first thought was to skip the sewing and use my existing 12" pocketed page protectors but I had two problems.
  1. I didn't have a spare album to put them in, and
  2. all the page protectors I owned at the time were side-opening, and the die-cuts kept falling out of them.
So I followed Lisa's idea and made my own A4 divided protectors, put them in a lever-arch folder, and that worked OK for a while, with me remembering to look through it occasionally.


This time round, I wanted to store not just my home-made die-cuts, but the bought ones as well, and also my stickers, rub-ons, cut-aparts, chipboard, pretty much anything that can be stored flat(ish).

Happily, I had recently bought a couple of Project-Life-branded albums on super-special, so now I DID have not only a spare 12" album, but some top-loading divided pages as well!


My album starts with words . . .


Then pretty much everything else, sorted by rainbow order . . .


Finishing with a small  multicoloured/themed section.

Finally, I've got my thin strips of patterned paper (manufacturing strips etc) because I liked these dividers I made too much to split them up and put them with my patterned papers. At a later date, I might make a couple more dividers and then store them in the appropriate colour section, along with my border stickers, but they're fine for now.


I LOVE my new system, and I find I am reaching for this folder Every. Single. Project. This page is a great example of how I pulled a bunch of embellishments together that I never would have thought of if they hadn't been together, sorted by colour.


Some tips (from me):
  • the "flat embellishments" versus bulky embellishments is my distinction, not Tiffany's. It all comes down to what storage system you use, but the less places you need to look to find your stuff, the better!
  • After cutting my sticker sheets apart to separate out my alphabets, I ended up cutting pretty much every sticker apart, in order to sort them by colour.  Same for my die-cut packs. Trust me, I am using my stickers and die-cuts so much more now!  I personally found it to be totally worth it!
  • If you can't bear the thought of breaking up your beautiful new sticker sheets and embellishment packs, try what Adele from Inkie Quill does and break them up after you've used them a few times.  (See her video here)That way you get the fun of your embellishments as a collection, if that's your thing, but won't be forever wasting time flicking through half-empty packages looking for that one perfect finishing touch.

Sunday, July 12, 2015

Craft Room Reorganisation 2: Embrace the rainbow (papers and cardstock)

Hi and I'm back with the second instalment of my reorganisation series.  I mentioned to you last time that I've been somewhat inspired during this process by Tiffany Spaulding.
Tiffany's 4 tiers of organisation are alphanumeric, which I covered last time, followed by theme, calendar year and rainbow. 
Now I don't buy themed products, nor does my scrapbooking reflect the seasons, probably due to the mild climate that we experience here.  (I know a lot of you do though, so if this is something you want to read more about, you might want to visit Tiffany here).
 So I've skipped straight to my favourite way of storing, rainbow!
I actually already store a lot of my supplies in rainbow order, but what makes Tiffany's system a bit different is that she has a "combine and conquer" approach rather than the mentality that a lot of us have with storing buttons in one place, ribbon somewhere else, wood veneer somewhere different again, etc etc.  But that's jumping ahead to the next instalment, so let's look for now at how I was storing my papers and cardstock, and what I've done differently.

Here's a somewhat warts-and-all look at my craft desk before I updated my organisation system:


The left-hand side of that open cupboard contained a file folder with all my patterned papers in it.  At various times I had tried storing by manufacturer or rainbow, or a combination of both.  Also in there is my home-made folder which stored my large off-cuts (which you can see back here).  That wooden stand on the top of the cabinet held my cardstock, in beautiful rainbow order but a bit too high up for easy accessibility. Also up there is the green expanding file which contains A4 and A3 cardstock or card-making. Finally the drawer you can just see in the bottom right of the photo holds my small scraps box (also shown in the link above) as well as my 6" pads.
Inspired by Tiffany to "combine and conquer" as well as her suggestion that vertical storage is easier to flick through than horizontal, I asked my lovely husband if he could put a top and bottom on the wooden stand.
He also painted it white for me to better match the Ikea cabinets, 'cause that's the great kind of guy he is. Here's what things look like now:


On it's side, the wooden stand now holds pattenered papers as well as cardstock, all in rainbow order.  I separated out the "large scraps" folder, and each coloured divider is stored in there as well.
 
I didn't have room for my A4 and A3 cardstock, so they're staying where they are for now.  Against Tiffany's advice, I've kept my small scraps box (although it is due for a cull and perhaps a "use-it-up" challenge).

I've kept my 6" papers in there as well, the difference being that I've pulled all the papers out  and they are now stored in rainbow order.


 A couple of tips from Tiffany:
  •  I pretty much skipped the "cull" step, but if you're the sort of person who has more craft supplies than they can use in a lifetime (and probably a collection that continues to grow) it's worth culling as you go - scraps that are smaller than you ever use, and patterns that you just can't imagine using any more.  Again, refer to Tiffany's website or Youtube channel if you need more direction with this.
  • regarding multi-coloured papers:  It's fine to have a section at the end which is "rainbow" or multi-coloured papers, but it's worth looking at each paper and thinking "what is the dominant colour" or "what colour on this paper speaks to me the most" and then storing in that colour section.
  • regarding double-sided papers: store in the section with the side you love the most.  If you have two sheets, you could always store one side in each section.  But don't stress about this too much, because it's easy to flick back through the papers and check the back sides!
I am loving how easy it is to flick through my papers and cardstock and see what I have! Part 3 coming soon, flat embellishments!


Saturday, July 4, 2015

Craft Room reorganisation 1: Embrace the alphabet

For the longest time I was in denial, believing that I was the sort of person that didn't really buy stickers, alphabet or otherwise, and certainly couldn't justify the cost of Thickers, no matter how great they looked on a finished page.
Meanwhile the pizza box I stored all my stickers in slowly filled and eventually overflowed.  Mostly the ones you get in collection packs, but also the odd sheet (even, yes! Thickers) that I bought on special. Always on special. Not a lot, but over time it starts to add up.

I was finding I was reluctant to rifle through the box, and that when I did, I ended up with random letter stickers coming off their sheets and turning up in odd places.


Something Had to Be Done.

 I came across a Craft Room Tour on Youtube which mentioned Tiffany Spaulding, AKA "Totally Tiffany" and her organisation process. (If you've not heard of her before, you can find her Youtube channel here). Tiffany has live challenges running periodically, but if you're like me and just want to start when you want to start, you can just dive right into the videos and work at your own pace. 

Tiffany has what she calls a "four section system" which works throughout the whole craft room, the four sections being:
  1. alpha-numeric
  2. themes A-Z
  3. Calendar year
  4. the rainbow.
Today I'm just looking at her first section, alpha-numeric. So here's what my before looked like: letter stickers and Thickers shoved into a pizza box in a random order with all other sticker sheets.  A few old chipboard alphas in a drawer designated for chipboard.  Some rub-on alphas in a totally different drawer.  And a bunch of alphabet stamps stored with all my other stamps.
This is my after:


Now, I know this is not a lot of supplies compared to many of you, but the same principles would work whether you have one box of alphabets or ten.

Some tips from Tiffany:

  •  Store all your alphabets together, whether they be Thickers, rub-ons or whatever. That way, when you think "I need to make a title", you've only got to go to one place to see all your suplies.
  • Store your alphabets by size.  As she points out, when you're working on  a title, you've got a finite space  to work within. (You can always sort by colour within each size category)
  • Stamp out an impression of each set of alphabet stamps that you own, and then store that impression in the appropriately sized section of your alphabet storage.  That way you'll literally be reminded of every alphabet option you have as you flick through, even though you'll probably have your stamps stored in a different location.

Some tips from me:

  • Store all your stickers in plastic sleeves. (I've used A4 sheet protectors.  If I had less options, I coud literally put the whole lot in an A4 folder).  This is easier to pull your stickers in and out of than their original packaging, as well as providing protection.
  • Cut your sticker sheets apart! You know the 12" ones that might have 2 or 3 different sizes/colours/fonts?  And maybe some words, tabs and images as well? Separate each alphabet out and store it according to size.  Trust me, it makes it easier!
I hope this is helpful to someone.  Of course, you can go and check out Tiffany's Youtube channel above, or go to her website if joining in her challenge is something you think you'd like to do.
For my part, I'll be back soon with at least 2 more posts in this series.
Bye for now!

Monday, August 13, 2012

A cleaning schedule for the perpetually hopeless

In my "ten things" post last month, one of my goals was to "organise how I'm going to get more organised". 
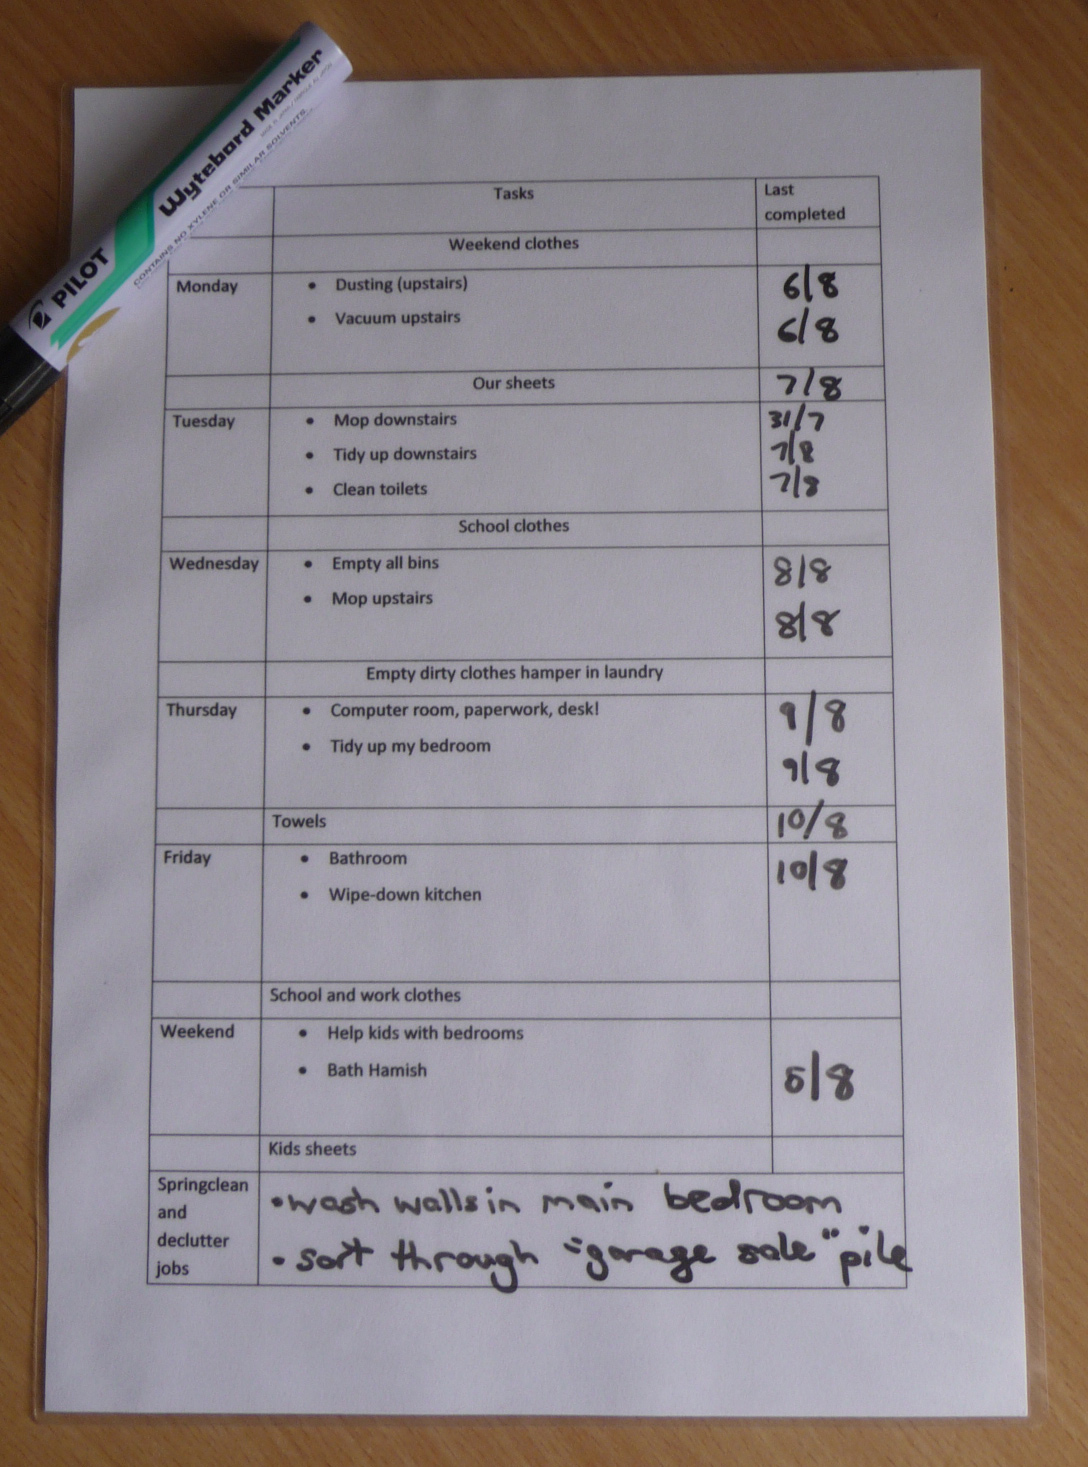
I'm pleased to be able to tell you that I have made some progress, and share with you my new cleaning schedule.

(By the way, if you're the sort of person with a touch of OCD in your cleaning style - you know, can't leave the house until every surface is sparkling, you might want to go off and polish your silverware rather than waste your time reading this post.  If, on the other hand, phrases like "I can't remember the last time I -insert dreaded chore of choice here-" regularly roll off your tongue, then sit back and read on!)

But first of all a bit about my relationship with cleaning.  Not being the most organised person on the planet, I like the idea of having a clean house, but I can easily get sidetracked . . . 
My sinus might be playing up, and I just can't face the dust. 
Or my back might be sore, so I'll go to bed with a heatpack. 
Or my hormones might be raging, and I'll be fit for nothing but curling up in bed with a book and a big block of chocolate. 
Or it's been raining solidly for weeks, and I've lost track of when I last washed the sheets. 
Or there's an event on at one of my kid's schools, which fills up my day leaving no time for mopping. 
Or it might be none of the above, but I'll be so overwhelmed by the sheer number of chores there are to do that I'll fail to do anything at all!

My goal, I've decided is not to turn my house into a magazine cover-worthy show-piece every day of the week.  That, for me at least, would be impossible. 
What I think is achievable, on the other hand, is a method that gives me some direction, and helps me keep track of where I'm at.  Because, quite frankly, I don't think the world will end if, every now and again the floors don't get mopped or we sleep in the same sheets for another week!

Here's why I think having a schedule, any cleaning schedule is a good thing.  It eliminates that overwhelming "too many chores" kind of feeling. If it's Monday, just dust and vacuum.  No decisions to be made, no need to feel like it "all" has to be done.


I've tried to write my schedule so that it works in with our family schedule as it is at the moment. (For example, my husband leads a Bible Study in our open plan lounge/dining room/kitchen every Tuesday night, so cleaning that area is my Tuesday job)
What I'm hoping will be the secret to my success, though, is the final column, "last completed".  By laminating the schedule and using a whiteboard marker, I can easily keep track of when each job was last completed.  So I didn't mop downstairs last week? No big deal.  I can see that at a glance and make extra sure it's a priority this week.

For the time being, this is my weekly jobs only, although I have put space at the bottom for current spring-cleaning  and de-cluttering jobs.  If this one is still working well after a month or so, I may attempt a similar system for spring-cleaning jobs also.
What about you?  Do you clean to a schedule?  What methods have and haven't worked for you in the past?  (OCD silverware cleaners need not reply)