Tuesday, August 7, 2012

August Counterfeit Kit - "Memories of Summer"

I loved playing along with the girls at the Counterfeit Kit Challenge last month, and I just couldn't wait for the new inspiration kit to be announced!  Last time I spent a chunk of money on craft supplies (I talk about it here)  I bought some Basic Grey papers, so I was kind of hoping for a kit that worked with the BG collections "Out of Print" or "Konnichiwa".  In fact, I had even gone so far as to pull out some photos that would work with the "Out of Print" papers. 
So when the kit turned out to be a digital kit called "Summer Lovin" I was a teensy bit disappointed.  Not because I don't have a bucket of old summer holidays to scrapbook, but because I wasn't sure if I had enough papers in my stash to pull off another summery kit!

I'll leave it up to you to see how well I did . . .


Starting from left to right, here are 3 papers from Echo Park "A Boy's Life", one  Crate Paper and the rest various collections from Basic Grey.  I used the chevron paper as my starting point of which colours to use, with the exception of some hot pink.  If you think those last two papers are a bit of an odd choice, I really chose them for the "B" side . . . . 


See those greens?  That's better, isn't it!  All the papers except the ledger paper are double sided.

The inspiration kit had a woodgrain paper, so I've added some 6" sheets this month as well including some woodgrain themed ones, and all the remains of my A Boy's Life pad:


My biggest problem with my kit last month was the mental block associated with the thought of cutting into a brand new, recently purchased sheet of paper.  This month, therefore, I've tried to overcome that block by "officially" including more off-cuts into my kit.  Here they are:


After the blog hop I was inspired to add some thin strips as well as this paper with the bicycle motif . . .


Embellishments next!  The digital kit has LOADS of embellishments.  I had already decided to try and add more product this month, sort of like my "product challenge to self".  Here's what I've pulled out:


In this photo I've got some new (to me) product - twine, pins, and washi, as well as my mini-misters.  Then there's also coloured staples, the Chipboard mat stack again (with a cut-out of the relatively successful book labels to hopefully remind me to use them) as well as a few other chipboard bits and pieces.


There's a few felt embellishments in the inspiration kit, so I've pulled out felt in every colour I have that matches.  Then there's also a random tag left over from last months kit, some braids and ribbons (mainly gingham and polka dots, but again, I don't promise I won't end up using something different if it works better).  After discovering my new-found ability to colour white flowers with my misters, I've realised I don't have many white flowers left! So if any shopping needs to be done this month, it could be for white flowers . . .


I've also included this recent parcel of loveliness, which is yet to even come out of it's packaging.  I'm not sure how well it will go with everything else in the kit, but it's too new and too fun-looking not to want to try and use!


For lettering, I've kept out most of the stickers and tiles from last month, and added the matching stickers from "A Boys Life" (as yet unused) and a very well used Basic Grey sheet that I'm hoping to get a bit more love out of!

For my stamps I've kept out three of the sets from last month, and added my cute little Stampin' Up family stamp sets.

The one thing I haven't included in my kit is cardstock.  I spent most of last month wondering if I was better off adding heaps more cardstock or just not adding any, and pulling out what I wanted to use as I went.  In the end, I've opted for the latter, although if I go out to scrap anywhere, I could of course add some then.

So that's my kit! A nice mix of new and old and somewhere inbetween.   I've named it "Memories of Summer" because it sure ain't summer here now, but I hope to use it to document lots of memories of summers past . . .


Monday, August 6, 2012

July Counterfeit Kit Wrap-up

Here's what's left of the papers from my Counterfeit Kit after 7 pages and 5 cards: First up, the Hello Summer papers (and the one on the left is the Basic Grey offcut). 


And here's the This & That papers:


These photos were taken before I made the butterfly card in my last post, which uses that middle pink paper as it's background.
I started just playing around with the larger sheets, until I came up with something that looked a little bit like this:


The only cutting I did to get to this "starting point" was to trim a row of flash cards off the other side of that teal damask paper.  At this point nothing was adhered to anything in any way - I wasn't going to commit any further until I looked for a photo/photos to match.
And I found one!  This photo was taken quite a few Christmases back at my sister-in-law's.  The papers perfectly matched Maddy's shirt and Ariel's tail!

  
My aim with finishing this page was to see what else I could use from the kit, without just gratuitously adding product.   (The little banners and the "You Make Me Happy", if you're trying to play Eye-Spy, I think are from another, shorter offcut of that border strip paper that I found after I took the photos.  Similarly, most of the thin strips of paper in my clusters are actually from the branding strips, which didn't make it into the photos either)
An aside: The first paper flowers I ever bought were three packets of white ones in different sizes.  (I'm not sure if they hadn't started packaging them in multi-sized packs back then?)  My reasoning was that I could just re-colour them to suit my projects, and I would never need to buy another colour!  My first attempt, using an ink-pad, was NOT a success.  Needless to say, I have since bought flowers in many other colours, and have been gradually using white flowers untouched ever since.  I'm happy to report success, FINALLY with my home-mixed mini-mister on the flowers on this page!


I'm going to call my July Kit finished . . . thanks for sharing the journey with me this month, it's been fun!

Saturday, August 4, 2012

Signature Style?


CASE Study is celebrating their second anniversary this month, and the challenge for this week is to create a project in your "signature style". I always laugh at suggestions that I should have one of those.  My garden, for example, is a mottled mix of Australian native, cottage, permaculture and children's play area!  And I think my crafting style is a bit the same - sometimes a bit cute, occasionally a bit arty, often pretty CAS, with a bit of inspiration from whatever blogs I've been reading lately.. 
But I did come up with a card that I think embodies a lot of what I've been really enjoying lately.  Bright colours (I used the latest ColourQ combo) . . .


. . . a background sheet of PP from my Couterfeit Kit, some off-cuts from my stash, some stitching, my absolute favourite tool (my Silhouette) and of course, a butterfly . . .


Thanks for stopping by, I hope you have a great weekend!

Friday, August 3, 2012

Pinstrosity - Skip the Frosting . . . or skip the sticky disaster?

Ah, Pinterest!  If you want to waste 20 minutes in front of your computer, what better way to do it than by gratuitously pinning DIY projects and culinary masterpieces you never have any intention of actually attempting yourself!?
Unless, of course, you spend it on the entertaining blog, Pinstrosity, where they showcase the attempts (and sometime disasters!) of those pinners out there actually foolish enough to have a go at those ridiculously complicated looking pins?  But it's not just about laughing at the disasters (although that's kind of fun too!)  These girls are the Mythbusters of the Pinterest world, researching and analysing what went wrong and attempting to find a fix for next time.
To celebrate their 100th post and 1,000,000th view, Pinstrosity are challenging their readers to attempt to recreate a pin from their "to test" board, with a $50 Amazon Gift Card up for grabs. 

So for something a little different, dear readers, here is my attempt to recreate:

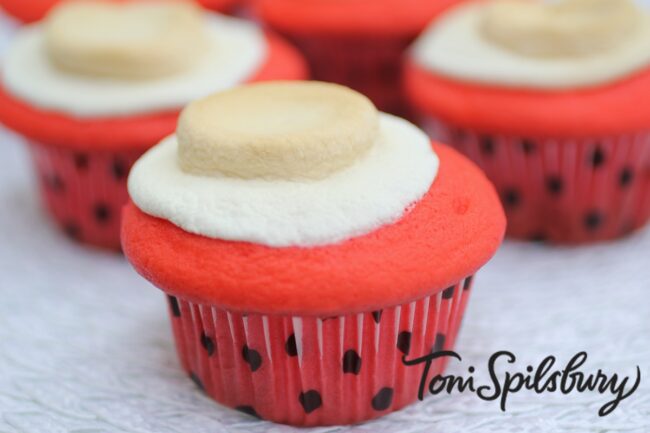
Skip the Frosting Cupcakes!


The Original pin:

http://tonispilsbury.com/skip-frosting-cupcakes/

When I skimmed the "to test" board, this one seemed a bit of a no-brainer to me . . . a bit of baking is always welcome in this house, and I had a packet of marshmallows left over from Maddy's party, so I didn't even need to head out for supplies!  And besides, what could possibly go wrong with something as (seemingly) simple as this?

The original post states:  
"Want to make cupcakes in a hurry?  Skip the frosting!  Set your baking timer for five minutes before your cupcakes are done and place a large marshmallow on top of each cupcake". 
And that's it!  She does go on to suggest her own Red Velvet Cupcake recipe, but I decided to use my own tried-and-true Red Velvet Cupcake recipe that my family already loves.

But rather than just tell you about it, why don't I show you how it all went!  So far, so good,  everything started out very normally . . .


. . . it was about this time that Maddy said to me, "hey Mum, did you get this marshmallow idea off Pinterest?"
me: "Yes, why?"
Maddy: "because if it goes wrong, we can write about it to Pinstrosity!" Obviously I hadn't explained to her at that point that this was the whole point - aside from the obvious eating of the cupcakes. Of course.


as directed, we set the  timer for 5 minutes before the end of cooking time . . 


 . . .still looking good, the cupcakes are back in the oven with marshmallows on top (although my oven door's not looking so good - perhaps it's time to give my oven a clean!)  We set the timer set for another 5 minutes.
 
Now before I show you my end results, perhaps you would like to see how they are meant to turn out:


With that teaser in mind, let's get back to my oven, only about one minute in of the required five . . .


Hmmm. . . let's have a look at how they looked when they came out of the oven:


. . . and here's how they looked when I tried to "relocate" some of that marshmallow back on top of the cakes:


Pinstrosity or Pin Win?  Well from a visual perspective the experiment was clearly a disaster.  Rather than keeping those lovely shaped tops like in the blog post, mine just oozed off to the side in a runny mess.  Worst of all, everywhere that the Marshmallow burst out of the outer crust was of course sticky, making packaging a bit of a problem.
But as they say in Masterchef, (once they've finished criticising the presentation) it all comes down to taste.  100% of judges in the 9 to 13 age range were perfectly happy to eat them, and preferred them to the more traditional cream-cheese icing. Bear in mind, though, that these same judges would eat a whole packet of marshmallow straight, if their parents would let them.  Judges in the 30+ age range, on the other hand, found the taste a bit sickly and would, quite frankly, prefer to eat their Red Velvet Cupcakes with no topping whatsoever.


So despite what my children say, I'm calling this one a Pinstrosity, so all that's left is to analyse what went wrong. 

Well, straight away I know what you're thinking . . .she didn't use the suggested recipe, so maybe the problem was the temperature?  It was probably too hot and it melted too fast?  Well, no.  My recipe calls for an oven temp of 165 degrees C.  The suggested recipe uses 350 degrees F, which, it turns out, converts to 176.66666 degrees C (or for those of us who use Celcius, a moderate oven setting is 180 degrees).   So the suggested recipe would have required a hotter oven which, if anything, would have melted the marshmallow even faster!

OK, so what if, as my husband suggested, you put the marshmallows in the oven for a shorter amount of time?  Again, I don't think so, as most of the melting actually occured in the first minute or so. 

I'm just going to come straight out and make a bold prediction. It all comes down to the actual marshmallow. Nowhere on her blog post does she mention the brand of the marshmallow she uses.  My family uses marshmallows almost solely for roasting over campfires, with the very occasional floating in a mug of hot chocolate.  I seem to remember somewhere deep in the past being disappointed with some brands of marshmallows not melting satisfactorily.  I suspect those marshmallows might work better for this recipe! I personally didn't love this enough to try again with a different brand, but if you are . . . we used Pascalls brand marshmallows - the pack with a mix of white and pink.  I should also point out that they were made in an Australian factory, as I think there's a chance that even marshmallows manufactured under the same name in a different country might use a different recipe.  

Well, thanks for stopping by, and if you're up for a challenge yourself, you've still got a couple of days to pop on over to Pinstrosity and test out a pin yourself! 

Tuesday, July 31, 2012

Parcels from everywhere (and the last of the Swansea pages)


OK, so that may not be the most accurate title ever, unless you actually do classify the UK and the USA as "everywhere", but it was still pretty exciting to get not one but two parcels of crafty goodies from across the globe in one day!

First up: I've been increasingly drawn in to the lure of the washi, and decided the time had finally come.  I figured washi tape wasn't the sort of thing to only buy one of (it would never be the right colour!) so I made the most of a free postage offer from Amy Tan's blog, and ordered some from Freckled Fawn :


I also bought a pack of doilies. (You've already seen one of those in  action if you read my last post on my CASE study card).

Then there was my lovely winnings from the Organisation Celebration at Jennifer's Jumbles, courtesy of Julie Kirk's etsy shop:


Lots of mist-able, paint-able goodness in there, let me tell you!

And that was after I had been to Lincraft that morning, where (among other, less interesting purchases) I had bought some pins with the pearlised heads.  The rationale being, whatever I don't use on paper craft projects, I can probably use to, oh, I don't know, pin bits of material together while sewing.

So that afternoon I decided to take very seriously my almost-motto of the year,  "Use what's new, while it's still new".


See that little flag?  See the pin?  And the washi tape flag?  That's what I call using something new!

Before I go ahead and show you the whole page, (which is pretty much all Counterfeit Kit other than those new additions) let me just say that I would never put butterflies - let alone pink butterflies - onto a page about "real" skateboarding.  A page about skating and scooting around the caravan park with Ben and Jess, on the other hand . . . well, you tell me what you think . . .


I used a few of the stamps that I had put into my kit for this one, which was fun.  I particularly like how the sunburst stamp looked on my chipboard buttons! 
The scraps that I used for the title and the butterflies on this one are both quite old.  Anyone else remember the Chatterbox "Scrapbooking Walls" collections?  Turns out those thinner papers are a little prone to ripping in the Silhouette . . . or maybe I just didn't have the blade setting correct!

For this next page, the trick was that I wanted to have it flow on from the Swansea pages that come before it in the album:


 . . . and also connect with the page it will sit next to, which I had completed a month or so earlier for a different challenge:


So from my Counterfeit Kit I used the yellow and white chevron as a background, the white Thickers, and kept the idea of the butterflies attached with buttons.

And from the Sunset page, I took the orange splatters, purple fibres, tags and the strips of paper in the embellishment clusters.  I was also able to re-use the ribbon-threading punch and wove another strip of paper through it.  I had already felt like a bit of a magician on the Sunset page, finding all those Fusion and other Basic Grey bits and pieces, so I really felt like I was scraping the bottom of my magic hat pulling out all the bits for this one!
The story of this page is about the rest of us taking a walk and visiting my husband fishing on the lake.  The evening finished with watching that beautiful sunset, and fish for dinner - from the local take-away!


Monday, July 30, 2012

Another card with CASE Study

First of all, I want to start of with a big THANK YOU and SORRY to all my lovely friends and visitors that have ever taken the time to leave a comment here on my blog.  I recently had a comment telling me that my Word Verification was really hard but - here comes the embarrassing bit - I didn't realise I actually had Word Verification turned on!!  So hopefully I've turned it off, now, and thanks again for everyone who stops by for a read.

But now to the important stuff . . .

One of my favourite little craft buddies, Hannah, is back in hospital again (and when I say "little" I am referring to her age, not her height, as she towers over me now!).   I thought I'd make here a card, and I've turned to this week's CASE study inspiration to get me started:


I really liked the doily stamp in brown on the kraft background.  I started there, added an actual doily, then just layered a bunch of fun stuff from my Counterfeit Kit.  Here it is:


I'm also submitting this card into the Simon Says "Anything Goes" challenge.

Thanks again for stopping by!


Sunday, July 22, 2012

A little birdie told me . . . Case Study, CASology, and Cards for Diggers

Yep! I promised cards with little birdies on them, and here they are!

First up, I was able to take inspiration from this week's challenge at Case Study, from this cute card here:


Here's my version:


So greatful for the idea of cutting apart the words once I'd stamped out my "Happy Birthday".

I am also entering this at CASology . . .


. . . because if cute little birds don't say happy, then what does, really?

I had another 2 pairs of birds to play with, and lots of cards needed this week, so I also made . . .


This next card ended up being my favourite, though.  I started with the idea of sewing some strips of paper from my paper strip stash .  Then, when I went looking for a base card to sew them onto, I came across a card which already had a circular window cut into it.  Now maybe  it's just because I was watching Baz Lurhmann's version of Romeo and Juliet last night, but that gave me an even better idea . . .


I love how the yellow bird is "serenading" the pink bird.  Note to self: make cards with windows more often!

From the perspective of using my Couterfeit Kit for these cards, well, I always reserved the right to add scraps from my stash, didn't I?  The birds (cut from the back of the blue paper on the last page I posted), the twine, ribbon and yellow paper on the second card are the only things strictly from the kit.  But everything else is from the stash, and I am A-OK with that.

In other card- and Counterfeit Kit- related news, the Counterfeit Kit girls issued a challenge to make a card for "Operation Write Home" (where card-makers donate cards for use by the US military).  This was not the first time I had heard of this concept, so I figured it was time to do some research and see if I could find an equivalent that was a little closer to home.

I found one, and it's called Cards for Diggers.  At the moment they are appealing primarily for Christmas cards, but after an email to Tracey, the organiser, I was happy to discover that cards for any and all occassions are greatfully received.  I've pulled a whole pile of cards from my "finished card" stash (some Christmas, but not all), and am hoping they'll be on their way to Tracey by the end of the week!