Thursday, March 14, 2013

Playing at Let's Scrap.

I've done a few pages at Lets Scrap over the last week.  Let's take a peek:

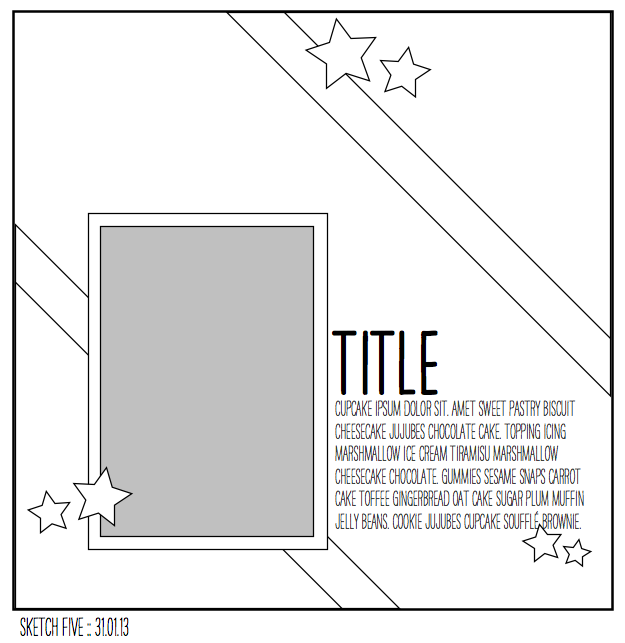
First up, the weekly sketch from last week:


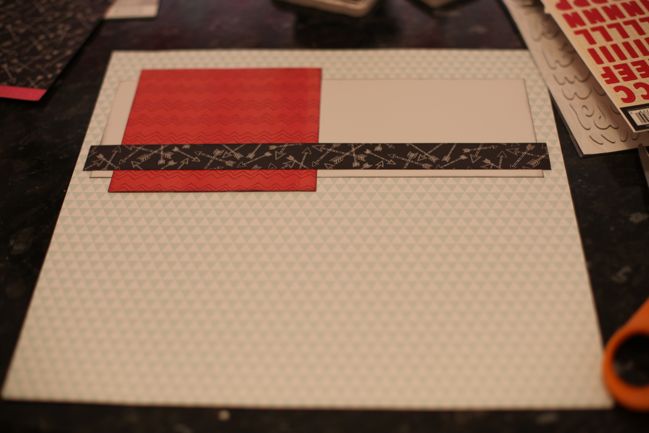
I took the left hand side of the sketch and rotated it 90 degrees.


The papers, DIY "flair" and fringed border are all from my Counterfeit Kit this month.


Next up, we've got the Scrap Your Stash challenge #24:  The criteria was to use at least 3 patterned papers, 1 cardstock, letter stickers, 1 die-cut, ribbon or twine, and 10 pieces of bling.  And of course a Lets Scrap sketch.  I chose this one:


I really did feel like I was "scrapping my stash" with this one - I didn't use my Counterfeit Kit but I was able to use two products that I love to bust out - thin strips of patterned paper and eggshell cardstock. My "bling" was some little music note confetti that I bought along with some other shapes and have had forever!


I "strung" my larger ukulele with single strand of embroidery floss,  and drew the strings onto the smaller one.


But what you really want to know, is what was the video that they were filming?  You don't think that a proud mum like me would forget to show you that, do you?  It's only a couple of minute long, so I hope you'll take a look!


Last but not least, is scrap your stash #25 and another "proud mum" page.  This one was a "bingo" style challenge . . .


 and once again a Lets Scrap sketch:


I've used the top row of the bingo card and the left hand side of the sketch.


The majority of the products on this one are once again from my Counterfeit Kit. (I've blurred all the girls faces in this one.  I didn't bother in the ukulele one because, well, they are on Youtube after all!)


Sunday, March 10, 2013

Kraft + white + bright = love!

Whenever I see kraft cardstock combined with white and bright colours, it is always love at first sight!

So when I saw this inspiration at CASE Study this week, I knew I wanted to play along:


I chose my colours by using this week's ColourQ combo:


And here's my card:


Here's another photo, because Maddy hasn't "styled" my photos in a while, and she wanted to "Australian" it up a bit!


Thanks for stopping by!

Wednesday, March 6, 2013

March Counterfeit Kit

Hooray for a new month, and a new inspiration kit over at the Counterfeit Kit Challenge!


What a big kit, full of so much fun product!  But what a lot to jam into one photograph!  And I do NOT have the patience to wade through the list of each individual items!
But that's OK.  In the end I began where I often do, by making a list of the main colours and elements in the kit, then  looking for a patterned paper in my stash with similar colours to base my kit around.  I ended up choosing a floral from EP For the Record 2:Documented, and a coordinating blue pattern.

Flowers, birds, butterflies, trees, banners, bright colours?  It's starting to sound like a . . .


In my mix of papers, you'll see some Echo Park, Studio Calico, Bella Carta and a Basic Grey.  In fact, pretty much the same collections you saw in my kit last month, and are likely to see over the next month or two as well until I reduce the stash down again!
 

I've kept my lettering pretty simple this month, but I'm bound to use my Silhouette and add some stickers over the course of the month . . . .


As well as a full sheet of journalling cards, I've pulled out a mix of cards and tags:


Embellishment time!


A few products that might or might not be inspired by the original kit! I've included all my wood veneers again because I'm loving using them, and those washi tapes because they're new and haven't been used at all!

Some DIY goodies:

It's been a while since I've used white embossed vellum butterflies, so they've fluttered out of their drawer. I also made from fringed trim from tissue paper and played around with some DIY "flair".  More on that in a later post, perhaps?


Die-cuts:


I've made up one owl, and cut enough pieces to make a few more.  I'm not sure if they'll make it onto any pages, but they'll sure make a cute, quick card!  And the kraft photo corners were another "just because", but now that I've made them, I want to make more in every single colour!

I could have counterfeited a whole lot more, especially banners, but in all honesty I got bored and wanted to get onto making actual pages!  I've got a whole bag of coordinating scraps which might or might not get used as the month progresses:


I'm excited. Are you excited?  I can't wait to see what we all produce with our kits this month!


Monday, March 4, 2013

February Counterfeit Kit Wrap-up (with a little bit of help from Shimelle)

On the 27th of February, I had decided, with 8 pages under my belt, that I was done with my Counterfeit Kit for the month.  Not as in used up every last bit, mind you, just run out of time.  But then on the 1st of March, I changed my mind and decided to have a go at maybe just an extra page or two. 
But where to go for a bit of help on the 1st of the month, when all the February challenges have finished and none of the March ones have started?  Why, Shimelle, of course!
I started with a starting point here


Here's my version:


If a tree falls in the forest and there's no one to hear it, does it make a sound?  Similarly, if a skateboarder pulls off a trick and there's no one to photograph it, did they really perform that trick?  Rohan is fortunate to have a friend who loves taking skateboard photos almost as much as he loves to skateboard, and these are a couple more of Liam's photos.
I used the free font, LogoSkate, to cut a few quick embellishments for this page.


This page came out of my own head, just inspired by the cute photo of Angus and his friend back in kindergarten, and the fun negative cut of the arrows.


Finally, a page based on this sketch:


 And once again, if you don't take this sketch as an opportunity to use up branding strips and other thin off-cuts of paper, I call that a wasted opportunity!


This is a bit of a new way of doing a double page for me, kind of a single page layout plus another page with supporting photos!

Woo-hoo, that brings my total of pages for the Kit up to 9 singles and 2 doubles, as well as using some more of my die-cuts, labels and wood veneers.  See you soon with my March kit!

Saturday, March 2, 2013

An unexpected craft room makeover!

Well, the work makeover might be a bit of an overstatement to get your attention . . . more like a rearrange, really.

I used to rearrange my craft room a lot, until I realised that my name is not Doctor Who and my craft room is only a small enclosed veranda and not, in fact, a tardis.

So when I had a new idea, I called Robert in to tell me why it wouldn't work (me - I'm the one with the ideas.  He's the one with the better sense of how things actually fit in a given space).  To my surprise, instead of confirming all the problems I'd thought of, he had solutions to all of them, so it was all systems go!

But what's that? You want to see what my craft room looks like first?  Fair enough. Here's a quick "before" tour:

On the left, here's a desk.  Let's call it the papercrafts desk,  although this desk was wedged into place when we first moved in to this house, long before I'd discovered stamping and scrapbooking.  And when I say "wedged" I mean, a few centimetres had to be trimmed off the sides, a corner cut out of the back and skirting boards removed so that it would fit! I don't think this desk is ever leaving this room!  Robert added the hutch for me later, and the little white shelf where the buttons on came later still.  The drawers only open about half way because the plastic drawer unit sits so close.

About as clean as my desk ever gets!


Straight ahead, we've got a set of drawers and shelves for storage.  Robert made these shelves back when we were first married and too poor to even afford Ikea furniture.  The original configuration had two of the big unit connected by some corner shelves.  The smaller unit was one of two which came later as kitchen storage in our second rental house.  These shelves have been used in my craft room in a variety of different combinations over the years.


To the right, we'll call this desk the sewing desk.  As well as where I do my sewing, this is where Maddy sits when she comes in to do some craft with me.  It's the second desk I've had in that spot, with a slightly larger desktop and more drawers than the last one.  Recently, I decided to move my Silhouette files onto my laptop so that I could use it in my craft room.  I love having it there, but sewing machine, overlocker, laptop and Silhouette . . . that's a lot of work for one little desk!  

Photo taken before Laptop and Silhouette moved in. 

Cue makeover!
 
Before we finish our tour, though, can I draw your attention down, at the revolting carpet.  It wasn't laid properly to begin with, and years of me rolling my chair over it has worn right through.  Every month or so, I've been cutting more chunks of carpet and underlay away.  You can see it best in the photo of the shelves.


Now, if it was just a matter of moving a couple of bits of furniture (and all the boxes and drawers that go with them) I probably would have been finished in time for lunch on Saturday.

But once things were out of the room was a perfect time to wash the windows . . .

. . .scrub the walls with bleach . . .

. . . and is there ever going to be a better time to rip up the revolting carpet?

The bulk of the work took place 2 weekends ago, and since then it's been fine tuning. Plus I took the best part of a week to search for some more plastic drawers to replace the drawer space I'd lost by taking out the sewing desk.

Room reveal time?  Ok!  The desk on the left looks pretty much the same, except a bit of movement on the hutch. And I now have enough room to open the drawers all the way!

In mid-project this time!
 Straight ahead,  instead of the shelves, is an old computer desk we've been procrastinating about what to do with.  In this photo, the laptop and Silhouette are out and in use:


  But when they're not is use:


Hidden away on the sliding keyboard drawer and printer drawer! Nice! 

Finally, to the right, where the sewing desk used to be:


That's where the shelves are now, with a bit of a rearrange of their contents.

So, hardly a glamorous "makeover" but I think a more practical use of the space.  Perhaps one day I'll replace some of the uglier boxes with nicer ones, but that's not on the top of the list for now. 

The one thing I'm really not happy with is the pile of pizza boxes on top of the old computer/new sewing desk. (They contain my current Counterfeit Kit and finished pages I haven't put into albums yet)  I suspect they'll end up under my papercrafts desk, but not until I've worked out what to do with the misting box and other bits and pieces that are there at the moment! 

(Like I said, it's really not a tardis!)

Her love language is "craft with Mum"

There's a certain girl in this house whose Love Language* is "quality time", and her particular dialect is "craft with Mum".

So back in January, I helped her to start on a bit of a craft project that she could work on while I was doing my own crafts.  Problem is, she takes after her grandmother (oh alright, and her mother) in that she wants to jump straight in at the deep end at the hardest project rather than starting at the beginning with an easy one!

She decided to design and make an "alien dog" stuffed toy.  It ended up being a joint project, with me doing the machine sewing and her doing the stuffing, making the tail and doing the hand sewing.

After two months, he's finished, and here he is:


And to give you a sense of scale, here he is with an actual dog:


Well done Maddy, but maybe we'll start with an easier project next time!

* from the "Five Love Languages" series of books by Gary Chapman

Friday, March 1, 2013

February Fabric Stashbusting

Wow! I'm really demonstrating my fabulous sewing skills so far this year.  Last month I made . . . a blanket, and this month . . . a pillow case!


Well, it's a dog bed, of course, but in terms of construction, it's a big pillow case stuffed with a few layers of an old mattress Robert was pulling apart (don't ask!)


This project counts as #2 of my goal to make a minimum of 6 projects from my stash, and also meets the suggested Stashbusting Sewalong challenge to "make something for someone that you love!" 

I didn't manage to complete my personal goal of completing one of the specific projects on my list, although I did do a burst of sewing yesterday and I now have a half-finished dress.  It's sleeveless, and today the weather has announced "Yes it is autumn now" with a windy, wet miserable day, so I'm suddenly a bit less motivated for that particular project!