Sunday, September 23, 2012

case study #109

This weekend, Rohan was invited to another one of those girls' joint birthday parties, so I decided to play along with CASE study this week and make them cards that were similar but different.


How cute are those owls sitting on top of each other?!?  I decided to take a different interpretation of putting my elements on top of one another, and channelled my inner Wilna again:


 A couple of hours before the party was due to start, Rohan started vomiting.  Needless to say, he's missed out on this particular party . . . I' hadn't quite finished the cards so I've left the labels blank for now, in case they end up being for an occasion other than a birthday!

P.S. my stylist caught me taking these photos without her assistance . . .  so here's another photo, Maddy-style!


Sunday, September 16, 2012

Use old supplies? You must have read my mind! (Or my blog)

Challenge #1 at the Counterfeit Kit Challenge this month is "an Oldie but a goodie": pick an old item from your stash and use it on your project.  As anyone who's spent any time at this blog knows, that's pretty much my story - trying to use up the old stash (without replacing it with too much new product that's going to end up being old stash five years from now)!
I ended up ramping up the challenge a bit, choosing not one but two old products, and using them on not one but two layouts.
My first product I'd already included in my add-on kit, vellum. I bought HEAPS of vellum back in the day, so I am always excited to find ways to use it up.  Product number two was a packet of starry confetti (the type you sprinkle on tables at parties).  That was one of those impulse purchases at my local $2 shop, which has been sitting in the drawer for years untouched. (If I get inspired they also came with music notes, moons, and little teddy bears . . . )

First up, I did a page for this month's challenge at Jay Gee's nook:


I took my inspiration from the stack of green cushions, and pulled all the bits of green paper out of my kit . . .


Can you see the vellum?  It is matting the photos, giving a subtle distinction between them and the busy papers, as per this link.  I forgot to take a close-up photo showing you the little stars, but they are scattered across the page from bottom left to top right.

I also liked those pins with the bows on them, and went to this tutorial which is all over Pinterest right now, to make some for myself.  I spent a ridiculous amount of time looking around my house for paper-clips to put them on, until I decided that pins would do just fine!


Next up, I used this sketch from ScrapFriends:


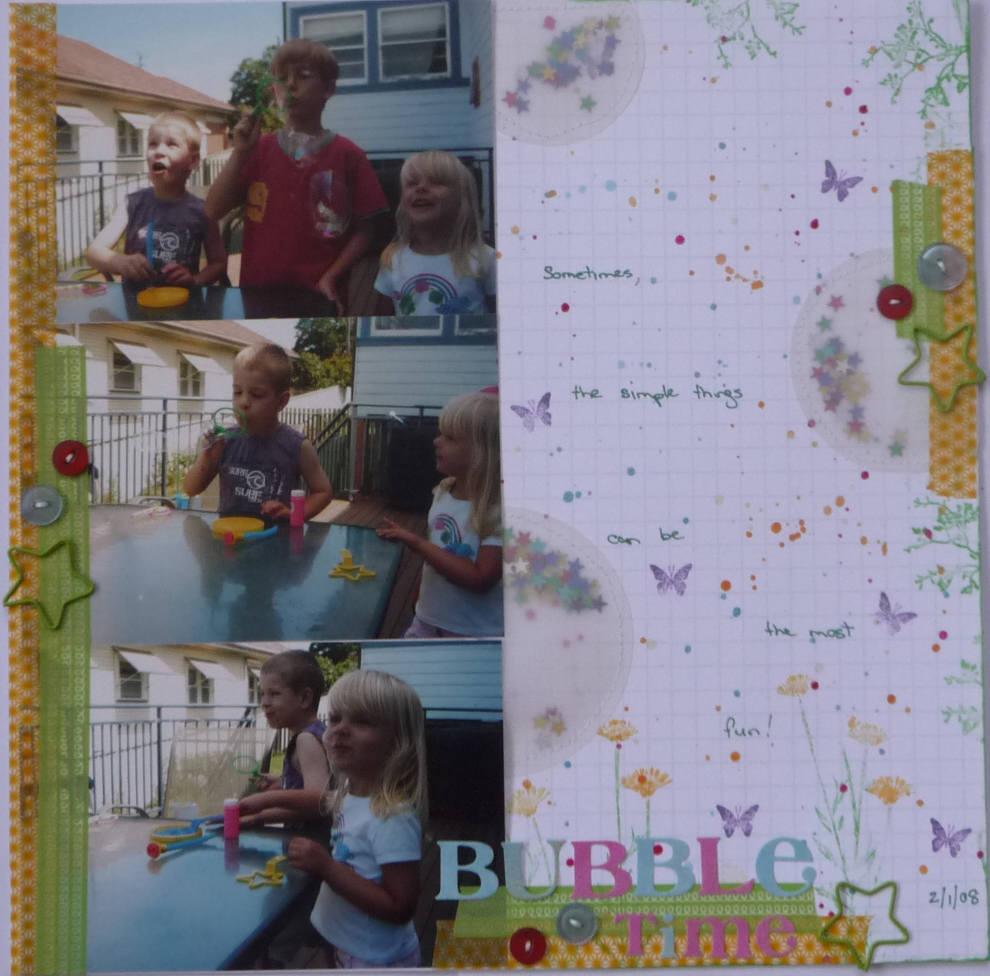
 The vellum and stars are a bit easier to see on this one . . . I cut circles of vellum and sewed them to the page to create confetti pockets.


I had heaps of fun with the splatters and stamping on this page too!


I got to a point on this one where I wasn't quite sure if I was finished or not, so I left it overnight.  My thought process went . . .bubbles . . . round things . . . Scrapbook Boutique!
Which might seem a bit random, unless you know that their current challenge (with amazing cupcake as always) is to include buttons on your project!


Thanks again,  Scrapbook Boutique, now I feel like my page is complete!


Saturday, September 8, 2012

September Counterfeit Kit

 Last month, when I put my Counterfeit Kit together I included a lot of off-cuts of various sizes to try and help me overcome that reluctance that sometimes happens when faced with a full sheet of patterned paper.  It certainly did help, but on the other hand, it's made it a lot harder for me to feel that my kit is anything like approaching "finished"!
Add that to the fact that I'm one week in to three weeks of work, and I've decided not to make a new kit this month.  But that doesn't mean I'm not going to play along at all! I've decided to continue on with last month's kit, with a small "add-on" kit to keep it fresh!  I've pretty much ignored the papers in the inspiration kit, for obvious reason, but I have taken some cues from the included embellishments.  So let's take a look . . .

 Like I said, still plenty of off-cuts to use!


I've already got the last full sheet of paper ear-marked for a project, (the pink and orange on the left) so I did add 4 new full sheets of paper.  The kit has some brown puffy letter stickers, so I thought I'd throw in this sheet of stickers in and see if I could make a title or two out of it . . .


 Here's how the embellishments from the original kit are looking - still pretty much the same .  . .


. . . inspired by those cute little hanger embellishments, I've added some craft wire and crystal beads . . .


The canvas, trim and banner pieces (on the left) are not so much new additions to the kit as forgotten pieces pulled to the top of the stack, again inspired by the original kit. 

I'm continuing with the CK +CCC  and once again giving myself free reign on my cardstock stash, and taking this cue to add some vellum into the layering mix as well.

So that's what I'll be trying to be working with this month, wish me luck and we'll see how much I get done!

P.S. If you're visiting from the Counterfeit Kit blog, I haven't linked all my pages from last month up, so feel free to scroll back through and have a browse!


PPS. ScrapFriends is giving away some awesome blog candy . . .


Like what you see?  This is just one of three prizes in their first birthday giveaway. Get over to ScrapFriends and check it out!


Use what you have; stash busting with Lets Scrap

Some of you might already know that my motto of the year is "Use what you have in a way that makes you happy".  Today's interpretation of that is, using off-cuts . . .without making more off-cuts!  In the photo below, you can see that I've cut the last of my chevron paper in two to spread it across the page.  The blue border strip was also cut into two long strips, and the off-cut of ledger paper was used as is (although I did end up cutting off a corner which was tucked under a photo to use on a different part of the page!)


I ran into trouble when the ribbon I wanted to thread through the punched holes wasn't long enough.  I ended up scrounging up enough by cutting strips of this yellow paper here:


I was using last week's Let's Scrap sketch, not for any particular challenge, when it occurred to me that I was only 12 brads short of completing the "Scrap Your Stash" challenge #21.


Here's a close-up of my layered leaves, a-la Wilna . . .


. . . and my journalling, where I managed to incorporate the word "advenure" from the paper . . .


Thanks for stopping by!


Sunday, September 2, 2012

The secret of my colour-matching success (part 2)

Hello and welcome to the second part of my tongue-in-cheek series entitled "the secret of my colour-matching success".  Tongue-in-cheek?  Well, as you've probably guessed, my secrets aren't really all that secret. 
Can you guess what my second "secret" is?  I'm willing to bet you've tried it yourself once or twice:

The Secret of my colour-matching success, Part 2, or let your patterned paper do the work for you!

 See, I told you it wasn't much of a secret!  Over the past year or so I've leaned much more towards using "B" sides, or tone-on-tone scrapbook papers.  But sometimes I still find a multi-coloured patterned paper can lead the way in choosing colours.
Here's some photos from a trip to Sydney's Luna Park, and a chevron paper I thought would go well with them:


Then I just pulled out lots of different papers (mainly tone-on-tone) that matched any of the colours on the chevron paper.  In this case this was ridiculously easy because a) I still had off-cuts from a number of papers from the same Echo Park collection, and b) this was basically how I put my Counterfeit Kit together, and therefore I had already done the hard work. 
But as I said last time, you really don't have to stick to collections.  I ended up using three papers from different collections on this occasion, but would have happily used more, depending on what I had in my stash.
I ended up making both a double-page and a single page from the photos of this particular day.
First the double:


I took Sketch 9-14-11 and  Challenge #143 at Lets Scrap, to include scoring and/or folding on your page in at least 2 ways. I incorporated this by making some pinwheels . . .

. . . and by folding up my pinked circles on the fold lines.

 
Next I made the single page, (which took place chronologically earlier, as we crossed Sydney Harbour Bridge to get to Luna Park).  As you can see, I used the same papers, and the left-over pinked circles, but in a slightly different way:


Believe it or not, this is the first time I have ever sewn my titles onto my pages, and only the second time I have sewn my journalling lines.  So I hope Clair won't be sick of me when I link up to her wonderful Stitching on Paper class just one more time!


Thanks for stopping by!  I start a block of three weeks casual work tomorrow, so if you don't hear so much of me over the next little while, you'll know why!

Saturday, September 1, 2012

The Festival of Dad(s)

It's that time again, Father's Day tomorrow (in this country at least!) and Robert's birthday on Monday, so it's man-card time again! 
First up, for Dad and John (my father-in-law), I crossed my fingers and toes that ColourQ would have a challenge without any pink in it.  Did they deliver?   


Oh yes, they sure did! The trees on this bedspread reminded me of a certain under-used Stampin' Up set I own, so I whipped up two of these:


I am loving that border stamp.  I never would have bought it myself, but it is finding it's way onto my cards and pages more and more.  I love how it "grounds" the other images on this card.  
I may have taken some liberty with the white on this card, but after all, eggshell is the new white!

Onto Robert's fathers day card now, and I whipped this one up quickly using some bits of pieces from my Counterfeit Kit:


The addition of a bit of stamping onto the flash card made a quick but fun card - and if you think I don't put a lot of effort into a card for my dearly beloved, pop over here to see my attitude on cards for men of a certain personality type!

Last but not least, the challenge at CASE Study this week is to "case yourself".  I yet again took a bit of liberty and cased a scrapbook page . . . that I haven't quite finished! (You'll see the end result soon, minus all those threads) . . .


I took the placement of the fussy-cut chevron paper and the overlapping papers as my starting point, and just used scraps that were still on my desk from the same page.


I tend to make cards A6 size by default, so they fit in a standard-size envelope.  So it was a bit of an ah-ha moment for me when I realised . . . cards that aren't going through the mail can be any size you like! Another way to use up the cardstock off-cuts I added to my Counterfeit Kit.

P.S. Are you enjoying the Paralympics as much as we are here?  We are particularly enjoying the wheelchair basketball.  Go Rollers! Go Gliders!