Showing posts with label stamping. Show all posts

Saturday, March 18, 2017

More Counterfeit Kit pages - with a bit of help from a couple of friends.

So you might or might not know that I fractured a bone in my foot at the start of the year.  After 11 weeks of hobbling around in a CAM boot, I'm very much looking forward to having another X-ray in a few days and (God willing!) being able to Get. Out. Of. That. Boot.
Unfortunately it's not guaranteed, and it could be that I spend many more weeks in the boot and ultimately even get it pinned, but I see no reason not to hope for the best at this stage. 
Knowing that my life might get back to normal soon (in terms of housework, exercise, paid work, etc etc) I'm aware that my time in the craft room might soon cut back.  So I'm trying to get as many pages done for my spending freeze goal as possible.

Here's what I've done in the last few days . . .

 First up, another page using the same "first day of school" photo, this time for Maddy's album.


Then I decided I needed a bit of inspiration, when I was struck by this lovely sketch at The Memory Nest.

Here's the page I created:

 Heard of "Christmas in July?" Although come to think of it, those of you in the Northern Hemisphere might not be aware of it's existence as a "thing" - it was created so we southerners could truly appreciate all the cold-weather Christmas trimmings like baked dinners and eggnog without doing it in the middle of a sweltering summer. 
Anyway, our kids and their friends wanted to twist it a bit - they had enjoyed an Easter joke-making session so much they wanted to repeat it - hence Easter in September!


The most common way I scrapbook multiple photos these days is to make a traditional page hero-ing one or two photos, and place the rest in a pocketed page protector.


In this case I ended up using both sides of the page-protector and making two "traditional" pages.


I was scrapping with my good buddy Glitter Girl while making this  second "traditional" page (by which of course I mean that I had Youtube running in the background), and she was scrapping with a stamp.  So of course I spent much too long looking for a dress-form stamp I thought I owned, before coming to the conclusion that I had borrowed it from a friend.  So I used a different stamp and cut a dress-form on my Silhouette.  Anyway I'm very grateful to my Superhero friend for her timely inspiration!


But wait, there's more!


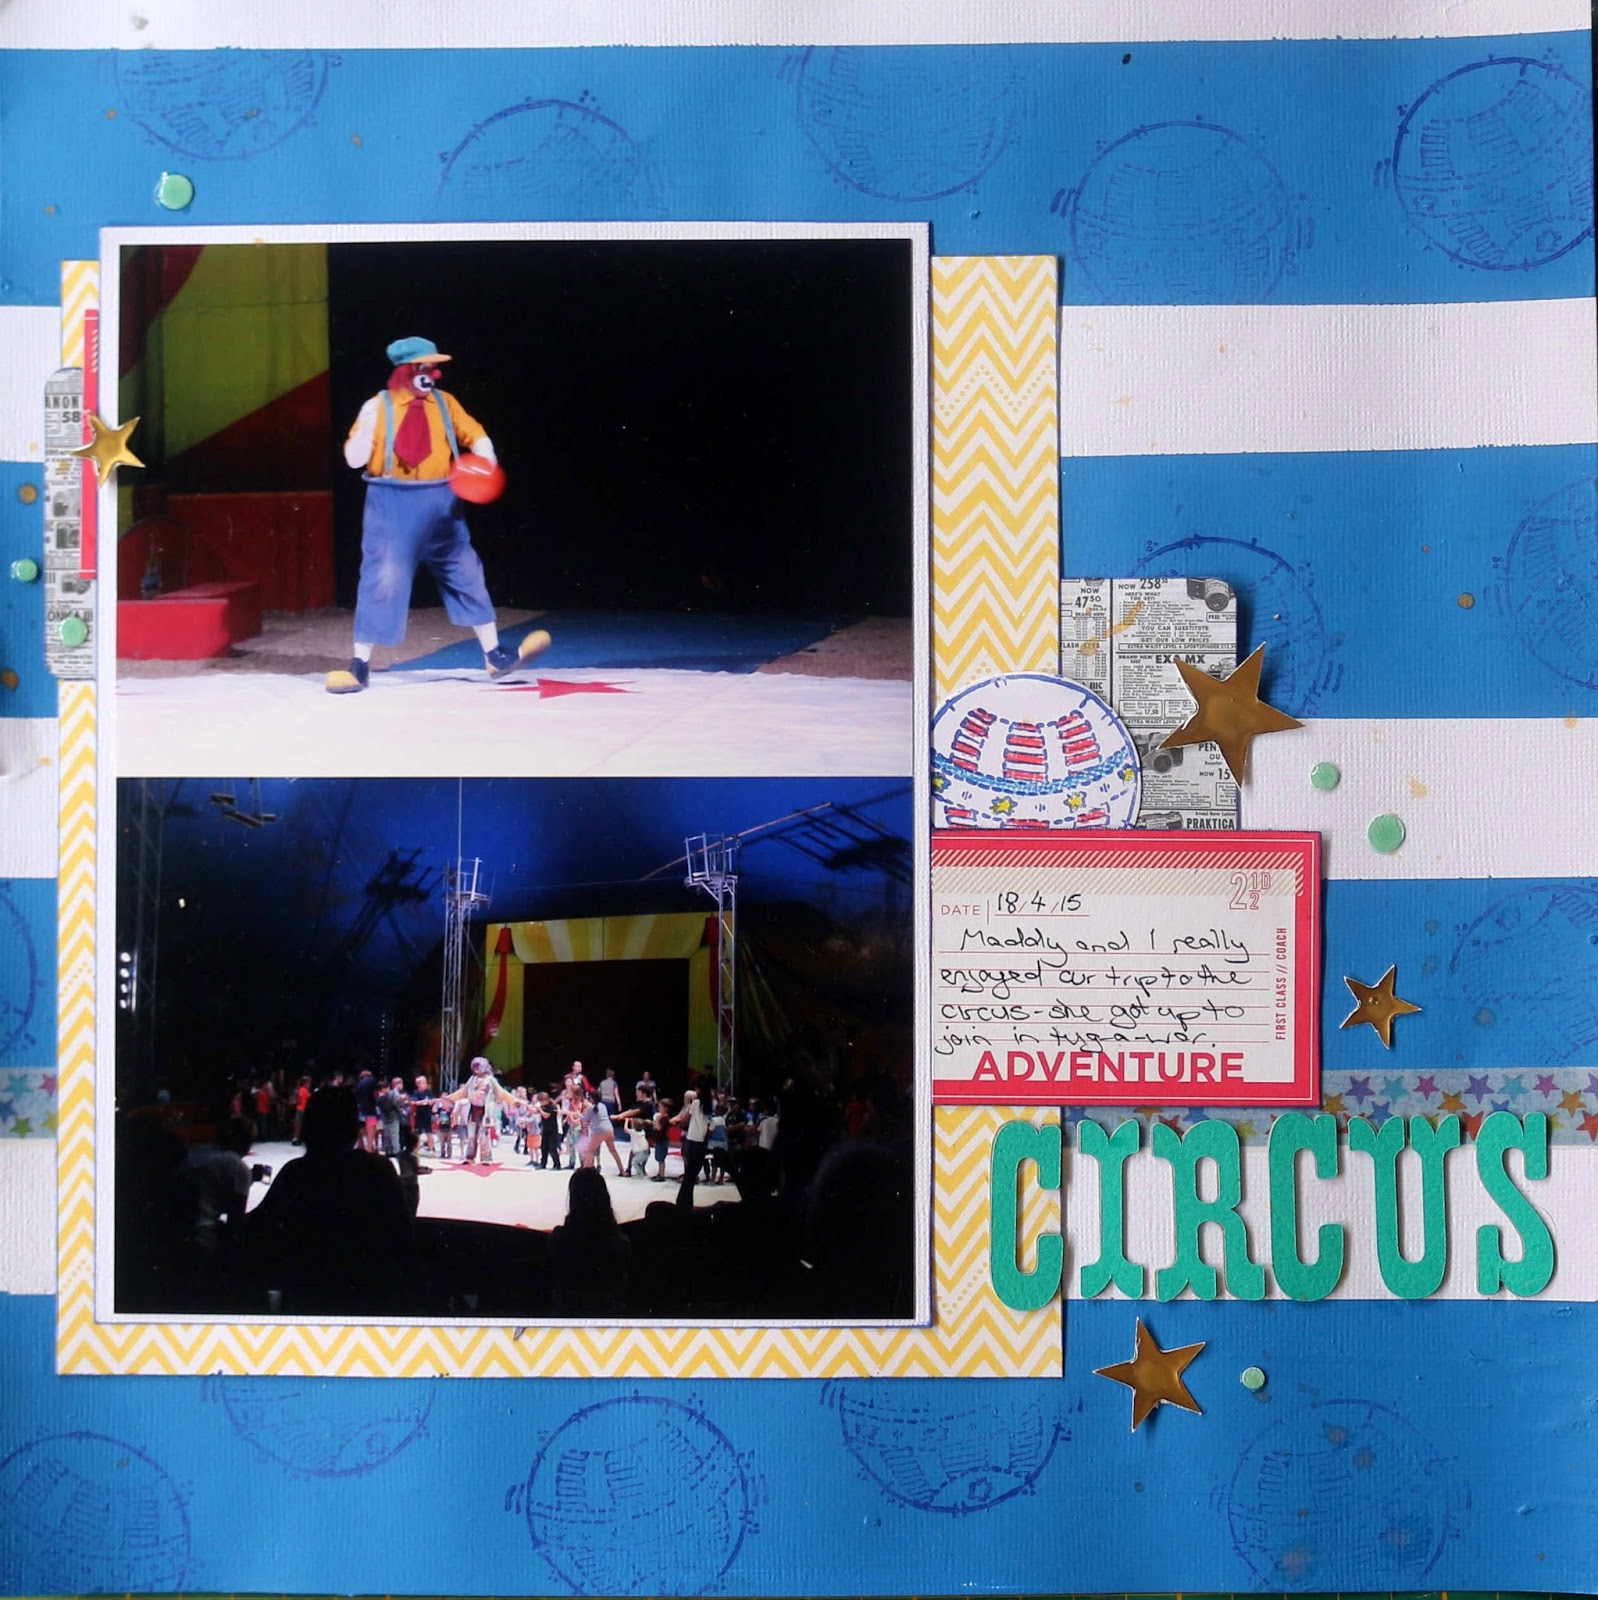
Because of course I was working on a Circus layout, and knew I had some circus stamps as well.  I was too far along in the process to include a clown stamp, but I used the big ball stamp in both my background and my cluster.  Happy days!


Phew! Thanks for visiting.  I'm heading back to the craft desk, and I hope you get to this weekend as well!

Wednesday, May 4, 2016

DIY Patterned papers (May Counterfeit Kit)

Here's what the Counterfeiters are inspired by this month from Crafty Templates  . . .


Very pretty, but the thing is, I don't have anything in my stash that resembles my favourite elements of this kit.  What's a respectable Counterfeiter to do but DIY some papers of her own?

Can you guess which ones my favourites were?


Let's go through them one by one, starting on the left with my vellums . . .


I picked a couple of stamps and stamped away on plain vellum, which I embossed with gold powder.  The one on the right is a bit 90's weddingish perhaps?   That's OK, I went to plenty of weddings in the 90's!


For the bokeh-inspired paper, I started by watching this video here:
 https://youtu.be/1hnLvIDciSE,

My process ended up being similar, but I used gelatos and the packaging technique for my background, before making up a quick stencil on my Silhouette and sponging white ink through that.


A close up of the texture.
 I could have done the turquoise paper the same way, but this time I stamped circles all over my cardstock using white ink and clear embossing powder, before adding my gelatos over the top.


Close-up
Finally the black and white striped paper.


Using my cutting mat as a guide, I marked off one inch stripes with a washi tape I don't love.  I then transferred my cardstock to my teflon craft mat before painting the stripes.  I did two coats for good measure . . .


After the paint was dry, it was just a matter of carefully peeling the washi tape away!


So what do you think?  None of these techniques were difficult and all of them were fun!
Let me know which one is your fave? Or do you have some other DIY tricks up your sleeve?
Talk to you soon!

Sunday, May 3, 2015

Gold Fever!!!!


 Do you remember your first love?  Your paper crafting first love, that is!  What got you started on this hobby? For me, it would have to be heat embossing.  Stamping an image, pouring the powder on, and then . . . the magic!  Heating that powder and watching it melt and transform into a beautiful shiny, raised surface.  Those of us who didn't have heat tools used our toasters . . . powder side up, of course!


So I'm so pleased that the gold thickers of the April Counterfeit Kit Challenge inspiration kit, "Messy Kit" reminded me of this love. And a bit of gold ink might have found it's way to some edges, as well. . .


After I'd made a couple of pages with my April kit, I decided I needed to focus on the black-and-white papers that I had included, and, with a bit of help from my February kit, ended up with 11 "starter page kits" scattered on my floor.

I didn't really think I'd get very far with those page kits, but a day off work during The Big Storm gave me some extra time.  (Mind you I did have a whole title ready to emboss before I realised it's a bit hard to use a heat gun with no power!)

I gave myself until the end of this weekend to finish as many as I could and I'm pretty pleased with how much I got done . . .


A little story about a giant pizza . . .


Our family loved the second of "The Voice" Australia.  If you haven't seen Harrison Craig's blind audition, it's totally worth a look. Maddy and I went to see him when he came to our local Westfield . . .

Loving the pink, gold and black/white stripe combo on this page . . . .

Working the green frame paper as a patterned paper as well as an embellishment  . . . 

After I scrapped this page about Rohan's presentation day last year we both realised there wasn't actually much to say . . . 

I'm loving those vellum hearts, and the bright colours on this page of Maddy painting a rock on the Port Macquarie breakwall . . . 

Rohan took some awesome photos of my niece and nephew with my brand new DSLR.  I love scrapping these guys, and not just because of the "you've scrapbooked my children more than I have" comments I get from my sister (check the comments below to see if she's been!)

Just a coffee break at our local shopping centre, but an Instagram competition (which I never entered) encouraged me to take this cute picture . . . 

Terrible photos but a memory I wanted to record . . .

It never would have occurred to me to put gold on a teenage boy page, but I'm loving how it looks . . .

There's two page kits left which I've set aside for now, mostly to see if there might be some other photos to include.

Thanks for stopping by. . . I hope you've had some crafty time this weekend, too!

Saturday, April 25, 2015

April Scrapbook Boutique Challenge

So today's been all about the post-blackout cleanup.  I've hung out 3 loads of washing, finished cooking up the meat from the freezer and spent endless hours trying to clean out what seems like a tree's worth of leaves the storm dumped into our pool.  Still, better than an actual tree, like a friend found in their pool the next morning!
High time to catch up on some blogging, I say! (By the way, if you're here for the Counterfeit Kit Challenge blog hop, keep scrolling down to the next post).

I fell in love with this month's challenge at Scrapbook Boutique the minute I saw it!


With my renewed love of metallic embossing, revived by this month's Counterfeit Kit, I knew I was going to have fun with this one!


The photos from Maddy's first aerobics challenge - with their black and silver uniforms - were perfect, and I thought this would be a brilliant opportunity to play with my gelatos!


I white-embossed some big swirls onto some watercolour paper, then went to town with 3 shades of gelato.  Some finger smudging, some water, and voila!


For the title, I pulled out some super-old chipboard letters. I peeled the top coat of patterned paper off, created an "r" out of an "n" and an "o" out of a "d", and embossed with silver.  Love it!

The wood veneer butterflies are my token nod to the chocolate icing on the inspiration piece.

Thanks for dropping by, I hope you're finding time to get inspired and get crafty this weekend, too.

Saturday, June 22, 2013

Finally starting on my June Counterfeit Kit.

So . . . what's been happening around here lately?  Some working, some sickness, some sewing . . . some more working, some more sickness . . . even the odd load of washing or two!  But finally I've made it into my craft room to play with my Counterfeit Kit!

Way, way back (or that's how it feels!) after I first made my Kit up, I decided to pull out some photos and keep matching photos to papers and cardstock until I'd allocated every sheet in the kit . . .


If I manage to get all those pages done, that would be 7 singles and 2 double page layouts.  . . . and I'll probably be adding a lot more product!  So that's the papers sorted, but my die-cuts don't match so well (note to self: when creating next month's kit: choose papers, then photos, then embellishments!)

OK, enough chattering, where are the pages already?!


A couple of pages for the neglected middle child, perhaps?


One covering the last day of school last year, when he said goodbye (at least in terms of sharing a classroom with them) to some of his best school friends, who have headed off to high school this year.


And one with photos from this year's swimming carnival.  We're not a very sporty family, and neither do we think leadership is one of our greatest qualities, so we were both surprised and delighted that Angus was voted House Captain this year. I love to call him "Captain Angus" at every opportunity.   He loves wearing his badge and, being captain of the red house, that red badge sure does stand out on his uniform!


June was the first kit in a few months that I didn't include DIY "flair" and "dimensional dots", so you can guess what I reached for on both pages, can't you!  Other additions to the kit include thin paper strips and extra washi on the first one, and 6" papers and red diecuts left over from another kit on the second one.

Also some new stamps from a recent spend.  True story: I was a bit annoyed that I hadn't thought to put my stamping on the "Hello holidays" page before I adhered my photos to the page, as there was a bit of a gap where the stamps didn't reach.  I figured I'd make it OK with layering and washi tape.  When I came back later, I realised, OH! the photos actually weren't adhered to the page at all! Ooops! Oh well, like I said, layering and washi tape!

Saturday, June 16, 2012

Stamp Camp memories

Not much craftiness going on here at the moment; I'm still working plus struggling with a cold, plus seemingly perpetual wet weather to add the challenge of getting the washing dry . . . you get the idea.
So today, I thought I'd finally publish a post on a page that I made back in April as an "assignment" for the "Hitchhiker's Guide to Scrapbooking class".  Chapter 3 is on using sketches.  Now I am no stranger to using sketches, so I could have skipped this assignment quite easily, but there was one sketch I really wanted to use.  The perfect sketch for someone with a Silhouette SD and knows they won't be getting a Cameo anytime soon . . .


See what I mean?  I can't fit a 12" sheet into my silhouette, but by hanging the shape off the edge of the page, it kind of looks like I can!

This story comes from way back in 2003 when I was heavily pregnant with Maddy.  My friend, Jade and I went up to our favourite Stamping shop's "stamp camp" for the day.
Can you see the name-tags that Jade and I are wearing in the photo?  Part of the preparation for the weekend was to decorate your own  name-tag, and both of us, without consultation, had added springy things to ours.
I used the same stamp as I did on my name-tag for my custom-stamped background.
If you've never done anything like my stamped background, it's actually pretty easy.  Start with your focal point (in this case my heading, stamp camp, in black) then randomly stamp your largest stamps (stamp in lilac and camp in blue) progressing down in sizes to fill in the blanks.  See, told you it was easy! 

This page could definitely be filed under "old photos go well with older products"; I used 3 sheets of paper out of the (thankfully shrinking) folder of "really quite old" papers, not to mention the fibres on the LHS border.

It's amazing that you haven't heard more from me about Jade, she is a dear friend and an avid stamper and scrapbooker.  The "House of Jade" is a  great source of inspiration to me, but it's her turn to have very young children, and my turn to re-train (last year) and attempt to re-enter the workforce (this year) making co-ordination time a bit of a challenge!
Jade credits me with introducing her to stamping, when she came to a Crafty Kids party at my house back in the early years.  I credit Jade as being the only crafty friend I have with a bigger stash than mine!

Thanks for stopping by, hopefully I'll be back in the craft room with something new to share with you soon!

Monday, May 7, 2012

Scrapbook Stamping

I first started out in card-making before I took the plunge into scrapbooking. And back then, card-making was pretty much synonymous with stamping.  I think one of the main reasons I started to scrapbook was the idea that I would have double the opportunity to use my tools and supplies - that was the stated reason of course, but there was also double the opportunity to buy more stuff!
And while I certainly have used my stamps in my albums over the years, there's always the sneaking feeling that many of my stamps have really not been used enough to justify their existence in my collection. 
That's why I was so excited to win a spot in Jen Gallagher's workshop, "Scrapbook Stamping" At 2Peas in a Bucket.
While I haven't finished the "assignments" for all the chapters yet, I've jumped ahead to the "bonus chapter" she added for "National Scrapbook Day", and here is my page which combines a range of stamping types:


The hoodie Angus is wearing in the photo immediately made me think of my Echo Park "This and That" 6" pad, so I chose all my papers out of that.  (Mind you, I think he'll be wearing it in every photo this winter, he only takes it off to have a bath and go to school - yes I have sometimes caught him sleeping in it!)


My title is a mix of letter and word stamps, and I added the pointer finger stamp to draw attention to the lizard he is holding.  Other stamping includes a clear-embossed background stamp, a thin border stamp and a journalling spot.  Our lizard does not yet have a name, and it is too young to tell whether it is a boy or a girl, so I included some question marks as embellishments.
 

I have used the Scrapbook Supplies Online sketch for this month.